6 Eco-Friendly Summer Crafts for Kids Using Recycled Materials
Looking for fun, low-cost craft ideas to keep your kids entertained during the summer holidays? These six eco-friendly and imaginative activities are perfect for children of all ages. Using recycled and natural materials, they’re not only budget-friendly but also great for sparking creativity, independence, and environmental awareness.
✂️ 1. Make a Holiday Hole Punch Sketchbook – A Portable Art Journal for Kids
A sketchbook is a magical object. Artists have long used them to play, explore, and imagine. Why not make your own travel-sized version to take on summer adventures? You never know when inspiration might strike!


How to:
- Choose your size – Decide how big or small you want your sketchbook to be. A6 or A5 is ideal for travel.
- Gather your paper – Use a mix of plain, lined, coloured, or recycled paper (old envelopes, wrapping paper, notepads).
- Cut your pages – Cut or tear your paper to the chosen size. Aim for 10–15 sheets.
- Make the covers – Cut two pieces of thicker card (like cereal boxes) to the same size as your pages.
- Punch holes – Use a hole punch to make two holes along one edge of each page and both covers. Line them up carefully.
- Bind your book – Thread string, wool, or ribbon through the holes. Tie a double knot, but not too tight – your pages should still open flat.
- Decorate – Voila! Now you can personalise the cover with drawings, stickers, or collage. Add your name and the date so you know it’s yours.
- Start creating – Use your sketchbook to draw, write, collect stickers, or paste in postcards and photos of the things you see on your summer break. A sketchbook can be personal or shared and makes a great keepsake for the future.
You’ll need:
- A selection of different papers. You can use recycled paper (envelopes, wrapping, notepaper etc), as well as cartridge or sugar paper.
- Cardboard or thicker paper for the cover.
- Hole punch
- String, wool, or ribbon
- Scissors (with adult supervision)
Suggested age: 3+
Estimated time: 30 minutes
Mess level: Low
Skills developed: Fine motor skills, visual storytelling, independence
📷 2. Build a Camera Obscura – Discover the Magic of Early Photography
What if I told you that the first ever camera was made over 2,000 years ago? The camera obscura is the ancestor of all modern cameras. Artists found it to be a really useful tool to help them draw people, objects and places from real life. There is plenty of evidence that great masters like Rembrandt used the camera obscura. Making one yourself is really easy. And best of all it requires no power source or expensive materials. It will totally transform the way you see the world around you!

How to:
Follow the instructions in this detailed Activity Pack written by photographer Jo Gane.
You’ll need:
- A cardboard box (a shoebox is ideal)
- Tracing paper
- Sticky tape
- Plastic magnifying lens (the type in children’s science kits is ideal) OR a piece of aluminium foil in which you will cut a 5-10mm hole.
- Scissors suitable for cutting card–or a craft knife and ruler (adult help required).
- Paint, stickers, pens or wrapping paper for decoration.
Suggested age: 5+
Estimated time: 45 minutes
Mess level: Medium
Skills developed: Scientific curiosity, visual literacy, historical awareness
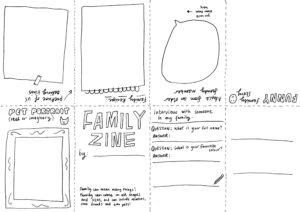
📰 3. Create a Family Zine – Share Your Stories
A zine (short for fanzine) is a mini magazine you make yourself. It can be about anything you’re passionate about – your family, pets, hobbies, or summer adventures! You decide the topic, content and style. A zine can be a great way for you to express your personal thoughts and share your voice with others.

How to:
Follow the instructions in this detailed instructions written by artist Sarah Taylor Silverwood.
You’ll need:
- Paper
- Drawing/writing materials
- Scissors (with adult supervision)
- Sarah’s zine template and instructions
Suggested age: All ages
Estimated time: 30–60 minutes
Mess level: Low
Skills developed: Self-expression, literacy, collaboration
🖍️ 4. Oil Pastel Transfer – Make Magical Monoprints
Ever wish you could make an exact copy of a picture? This monoprinting technique lets you transfer images from magazines using oil pastels. It’s a fun way to explore colour and texture.
You could go a step further and make colourful, surreal images by making a collage to work from first.
![]()
![]()
![]()
![]()
How to:
- Choose an image – Find a picture in a magazine or newspaper.
- Flip it over – On the back of the image, colour the entire surface with oil pastels. Use one colour or lots. Be sure to fill the whole page.
- Prepare your paper – Tape a blank sheet of paper to the table.
- Position your image – Place the coloured image face-down on the blank paper. Tape it in place.
- Trace the image – Use a biro or hard-tipped pen (like a Biro) to draw over the image. Press firmly and shade in darker areas.
- Reveal your print – Carefully lift the top sheet. The pastel will have transferred to the blank paper underneath!
- Experiment – Try combining different images into a collage before transferring for a surreal effect.
You’ll need:
- Printed images or magazines / newspapers
- Plain paper
- Oil pastels
- Sticky tape
- Biro pen
Suggested age: 5+
Estimated time: 30 minutes
Mess level: Medium
Skills developed: Observation, fine motor skills, printmaking techniques
♻️ 5. Scrap Sculptures – Turn Trash into Treasure
One person’s trash is another person’s treasure! Inspired by artists like Naum Gabo and Barbara Hepworth, this activity encourages kids to explore the qualities of different household materials and build their own creative sculptures.

How to:
Follow the instructions in this Activity Pack written by artist Benny Semp
You’ll need:
- Recycled materials
- Scissors (with adult supervision)
- Tape
- String, thread or wool
- Wax crayons
- Paper and pencil
Suggested age: 5+
Estimated time: 45–60 minutes
Mess level: High
Skills developed: 3D thinking, sustainability, creativity
🧲 6. Plasticine Stamp Printing – Explore Texture and Repetition
This printmaking activity uses plasticine and textured objects to create repeat patterns and designs.
There are lots of different ways to make prints, and Plasticine Stamp Printing is a fun and easy introduction. By repurposing household materials you can create really striking images. Explore different shapes, forms and textures and see what you can come up with!


How to:
- Find textured objects – Coins, pinecones, keys, LEGO bricks, or shells work well. They need to have a hard surface that will not be damaged by the plasticine.
- Prepare your plasticine – Roll a lump into a smooth, flat surface using your hands or a rolling pin.
- Make your stamp – Press your object into the plasticine to leave a clear imprint.
- Ink your stamp – Dab the plasticine onto a stamp pad a few times.
- Print your image – Press the inked side onto paper and peel it off carefully.
- Repeat – Reapply ink and try different objects or patterns.
- Clean and reuse – Wipe the plasticine clean and start again!
You’ll need:
- Plasticine
- Paper
- Stamp pad
- Small textured objects
- Wet wipes
Suggested age: 3+
Estimated time: 30 minutes
Mess level: Medium
Skills developed: Texture exploration, pattern recognition, printmaking
📸 Share Your Creations!
We’d love to see what you make! Tag us on social media @BarberInstitute or email your photos to [email protected] for a chance to be featured on our social media!